 Okay, so I built my 'Calimero' robot, that is to say, the robot itself, only to then discover that building a statuette out of styrofoam and papier-maché wasn't something I turned out to be any good at.
Long cursing and messing with sticky wads of paper story short: I decided to scrap the little project, Calimero looked more like E.T., sigh...
So... I had a functional robot, which worked flawlessly, but...
It was soooo ugly!
I only realised that after I uploade the pictures here. It simply looks like trash, despite it being a happy working robot, aaargh!
So I decided to take it apart and do something slightly different with it:
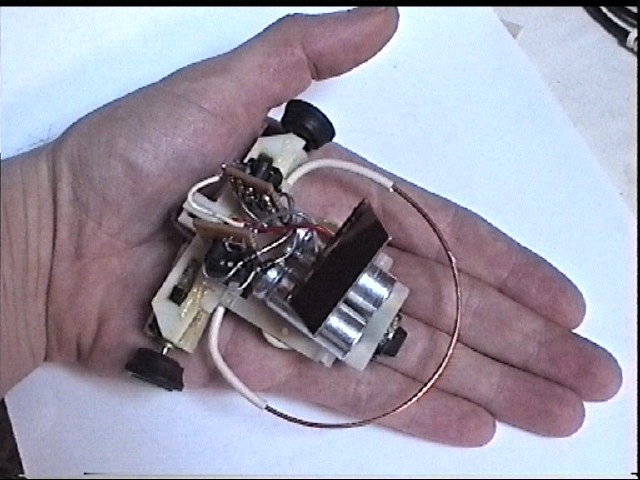
Presenting BEAM bot 'bumper car'
 The modifications to the actual circuit are fairly simple, and look largely cosmetic, but they have their advantages over the Calimero 'bot.
First thing I did was simply bend the connecting diode leads so that now the two solarengines circuits are facing back to back. This has the advantage that now the two photodiodes face outwards, and are more sensitive to variations in ligting-conditions around the little bugger. The two circuits, mounted on veroboard are now is a shallow open 'V' shape, almost, but not completely parallel. I imagine the tapered 'face' of a rabbit, you get the idea.
I was just lucky the leads were overly long so I could bend them quite a ways without them making contact with any other component.
 This is another picture of the now re-arranged setup, in my trademark 'splendid' grotty sloppily digitized VHS-quality style as per usual, heh.
The reason this pic looks even worse than the others is that it is in fact a blown up one, and it was hastily level-corrected, because it was totally off-colour, and I didn't feel like taking out the videocam again to make a good one (because that'd entail desoldering stuff from its mount etc.
I told you I was lazy. I'm lazy. I'll keep telling you, watch me.
The black-looking rectangular is a solar-cell from a calculator.
It is the biggest one I have yet found, and it pumps out quite a good dose of electrons :)
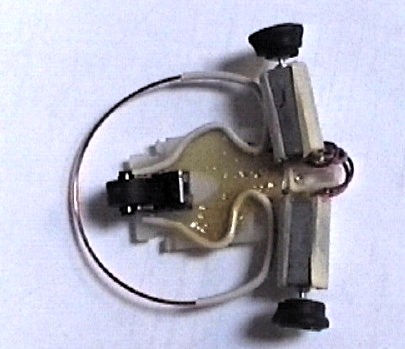
I stripped the capacitors from their plastic sleeves, because... Well, I thought it looked nicer that way.
I then bent their leads to I could solder them underneath the two circuits, sitting nicely side by side and they now act a bit as a 'foot' for the whole solarengines+solar cell setup.
No particular reason I did so, other than it made me think they somehow looked more 'engine' that way...
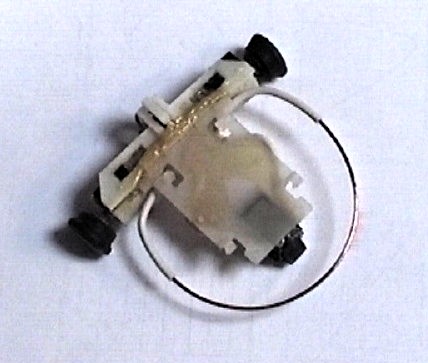
This is the undercarriage. The slimy looking yellow goo is contact-glue, applied rather overenthousiastically, grin.
The two engines are glued to a plastic thingy I found inside a printer I once cannibalized for its stepper-motors.
The nosewheel (a.k.a. pinch roller from a cassette deck mechanism) is glued onto a piece of plastic I salvaged out of a 5'1/4 disk-drive.
Then I glued a stiff electrical wire, partly stripped for visual and err... 'unstickability' effect, in a semicircular shape as bumper.
The rationale being that it prevents the robot to get stuck in corners and even walls, because it has no reverse 'gear'.
This really works, in most cases! When it faces a wall head-on, it starts to nudge in a certain direction (assuming the light isn't on the wall) and after awhile makes a near-complete circle, to drive away from it again, very nice.
On the underside you see the sea of glue...
In this picture of the underside, you see the pinch roller in all its (out of focused) glory. The mechanism wasn't totally symmetrical, so I ended up cutting lots of extraneous parts off of it, for no better reason than to make it look... More symmetrical. I'm not really a perfectionist, but sometimes I like to waste my time with such trivialities. Even though I'm lazy :)
 This picture is in some ways the most important one, because it shows how I slightly tilted the motors to give the construction more ground-clearage.
The wheels are so small, when I put my Calimero-bot together, the construction had problems to overcome very small bumps on a surface.
As spacers I used two small flatcable connectors, probably from a discarded computer board. It really helped.
 This is the semi-final result.
For fun, and because I'm still a kid despite my age, I added a toy-robot's head.
It now looks like a cross of a racecar and a robot on a wheelchair.
You can see it all looks a bit sloppy, but this pic was before I made the final adjustments of placeing things, and glueing them in place.
And as per usual I forgot to take a picture of the final result.
Conclusion: you too can make a cute little robotcar for less than 10 Euro/Dollars. Or if you use some stuff you salvaged from old equipment you can do it virtually for free.

1 comment:
I love your Blog, very interesting!!
My name is Phil W Little and
I’m the author of Hostile Intent and Hell In a Briefcase
You are more than welcome to visit my page.
Detective Matt
Cooper.blogspot.com
Post a Comment